Wednesday 28 December 2016

Unix (Reading and writing tapes, backups, and archives: The tar command )

The tar command stands for "tape archive". It is the "standard" way to read
and write archives (collections of files and whole directory trees).

Often you will find archives of stuff with names like stuff.tar, or stuff.tar.gz.  This
is stuff in a tar archive, and stuff in a tar archive which has been compressed using the
gzip compression program respectivly.

Chances are that if someone gives you a tape written on a UNIX system, it will be in tar format,
and you will use tar (and your tape drive) to read it.

Likewise, if you want to write a tape to give to someone else, you should probably use
tar as well.

Tar examples:

tar xv      Extracts (x) files from the default tape drive while listing (v = verbose)
            the file names to the screen.
tar tv      Lists the files from the default tape device without extracting them.
tar cv file1 file2     
            Write files 'file1' and 'file2' to the default tape device.
tar cvf archive.tar file1 [file2...]  
            Create a tar archive as a file "archive.tar" containing file1,
            file2...etc.
tar xvf archive.tar  extract from the archive file
tar cvfz archive.tar.gz dname   
            Create a gzip compressed tar archive containing everything in the directory
            'dname'. This does not work with all versions of tar.
tar xvfz archive.tar.gz         
            Extract a gzip compressed tar archive.  Does not work with all versions of tar.
tar cvfI archive.tar.bz2 dname  
            Create a bz2 compressed tar archive. Does not work with all versions of tar

Unix(Files)

ls --- lists your files
ls -l --- lists your files in 'long format', which contains lots of useful information, e.g. the exact size of the file, who owns the file and who has the right to look at it, and when it was last modified.
ls -a --- lists all files, including the ones whose filenames begin in a dot, which you do not always want to see.
There are many more options, for example to list files by size, by date, recursively etc.
  • more filename --- shows the first part of a file, just as much as will fit on one screen. Just hit the space bar to see more or q to quit. You can use /pattern to search for a pattern.
  • emacs filename --- is an editor that lets you create and edit a file. See the emacs page.
  • mv filename1 filename2 --- moves a file (i.e. gives it a different name, or moves it into a different directory (see below)
  • cp filename1 filename2 --- copies a file
  • rm filename --- removes a file. It is wise to use the option rm -i, which will ask you for confirmation before actually deleting anything. You can make this your default by making an alias in your .cshrc file.
  • diff filename1 filename2 --- compares files, and shows where they differ
  • wc filename --- tells you how many lines, words, and characters there are in a file
  • chmod options filename --- lets you change the read, write, and execute permissions on your files. The default is that only you can look at them and change them, but you may sometimes want to change these permissions. For example, chmod o+r filename will make the file readable for everyone, and chmod o-r filename will make it unreadable for others again. Note that for someone to be able to actually look at the file the directories it is in need to be at least executable. See help protection for more details.
  • File Compression
    • gzip filename --- compresses files, so that they take up much less space. Usually text files compress to about half their original size, but it depends very much on the size of the file and the nature of the contents. There are other tools for this purpose, too (e.g. compress), but gzip usually gives the highest compression rate. Gzip produces files with the ending '.gz' appended to the original filename.
    • gunzip filename --- uncompresses files compressed by gzip.
    • gzcat filename --- lets you look at a gzipped file without actually having to gunzip it (same as gunzip -c). You can even print it directly, using gzcat filename | lpr
  • printing
    • lpr filename --- print. Use the -P option to specify the printer name if you want to use a printer other than your default printer. For example, if you want to print double-sided, use 'lpr -Pvalkyr-d', or if you're at CSLI, you may want to use 'lpr -Pcord115-d'. See 'help printers' for more information about printers and their locations.
    • lpq --- check out the printer queue, e.g. to get the number needed for removal, or to see how many other files will be printed before yours will come out
    • lprm jobnumber --- remove something from the printer queue. You can find the job number by using lpq. Theoretically you also have to specify a printer name, but this isn't necessary as long as you use your default printer in the department.
    • genscript --- converts plain text files into postscript for printing, and gives you some options for formatting. Consider making an alias like alias ecop 'genscript -2 -r \!* | lpr -h -Pvalkyr' to print two pages on one piece of paper.
    • dvips filename --- print .dvi files (i.e. files produced by LaTeX). You can use dviselect to print only selected pages. See the LaTeX page for more information about how to save paper when printing drafts.
  • Unix Commands(About other people)

    w --- tells you who's logged in, and what they're doing. Especially useful: the 'idle' part. This allows you to see whether they're actually sitting there typing away at their keyboards right at the moment.

  • who --- tells you who's logged on, and where they're coming from. Useful if you're looking for someone who's actually physically in the same building as you, or in some other particular location.

  • finger username --- gives you lots of information about that user, e.g. when they last read their mail and whether they're logged in. Often people put other practical information, such as phone numbers and addresses, in a file called .plan. This information is also displayed by 'finger'.

  • last -1 username --- tells you when the user last logged on and off and from where. Without any options, last will give you a list of everyone's logins.

  • talk username --- lets you have a (typed) conversation with another user .

  • write username --- lets you exchange one-line messages with another user.

  • elm --- lets you send e-mail messages to people around the world (and, of course, read them). It's not the only mailer you can use, but the one we recommend. See the elm page, and find out about the departmental mailing lists (which you can also find in /user/linguistics/helpfile).
  • Unix Commands(Basics of the vi editor)

    vi filename

                    Creating text
    Edit modes: These keys enter editing modes and type in the text
    of your document.

    i     Insert before current cursor position
    I     Insert at beginning of current line
    a     Insert (append) after current cursor position
    A     Append to end of line
    r     Replace 1 character
    R     Replace mode
    <ESC> Terminate insertion or overwrite mode

                     Deletion of text

    x     Delete single character
    dd    Delete current line and put in buffer
    ndd   Delete n lines (n is a number) and put them in buffer
    J     Attaches the next line to the end of the current line (deletes carriage return).

                     Oops

    u     Undo last command

                     cut and paste
    yy    Yank current line into buffer
    nyy   Yank n lines into buffer
    p     Put the contents of the buffer after the current line
    P     Put the contents of the buffer before the current line

                    cursor positioning
    ^d    Page down
    ^u    Page up
    :n    Position cursor at line n
    :$    Position cursor at end of file
    ^g    Display current line number
    h,j,k,l Left,Down,Up, and Right respectivly. Your arrow keys should also work if
          if your keyboard mappings are anywhere near sane.

                   string substitution

    :n1,n2:s/string1/string2/[g]       Substitute string2 for string1 on lines
                                       n1 to n2. If g is included (meaning global), 
                                       all instances of string1 on each line
                                       are substituted. If g is not included,
                                       only the first instance per matching line is
                                       substituted.

        ^ matches start of line
        . matches any single character
        $ matches end of line

    These and other "special characters" (like the forward slash) can be "escaped" with \
    i.e to match the string "/usr/STRIM100/SOFT" say "\/usr\/STRIM100\/SOFT"

    Examples:

    :1,$:s/dog/cat/g                   Substitute 'cat' for 'dog', every instance
                                       for the entire file - lines 1 to $ (end of file)

    :23,25:/frog/bird/                 Substitute 'bird' for 'frog' on lines
                                       23 through 25. Only the first instance
                                       on each line is substituted.


                  Saving and quitting and other "ex" commands

    These commands are all prefixed by pressing colon (:) and then entered in the lower
    left corner of the window. They are called "ex" commands because they are commands
    of the ex text editor - the precursor line editor to the screen editor
    vi.   You cannot enter an "ex" command when you are in an edit mode (typing text onto the screen)
    Press <ESC> to exit from an editing mode.

    :w                Write the current file.
    :w new.file       Write the file to the name 'new.file'.
    :w! existing.file Overwrite an existing file with the file currently being edited.
    :wq               Write the file and quit.
    :q                Quit.
    :q!               Quit with no changes.

    :e filename       Open the file 'filename' for editing.

    :set number       Turns on line numbering
    :set nonumber     Turns off line numbering

    Sunday 25 December 2016

    Dynamic SQL

    Dynamic SQL
    Dynamic SQL describes any SQL DML statement assembled dynamically at runtime as a string and then submitted.

    Dynamic SQL is very useful for several tasks:
    # Multiple possible query criteria can be dynamically assembled into custom FROM, WHERE and ORDERS BY clauses for flexible queries.
    # Code can respond to the schema of the database and generate appropriate triggers, CRUD stored procedures and views.
    # Dynamic code can auto-generate very consistent stored procedures.

    Drawbacks of Dynamic SQL
    # Dynamic SQL that includes user entries in WHERE clauses can be open to SQL injection atacks.
    # Poorly written dynamic SQL queries often include extra table references and perform poorly.
    # T-SQL code that generates T-SQL code can be tricky to debug.

    [Via Microsoft SQL Server 2008 Bible By Paul Nielsen, Uttam Parui]

    Below are few awesome resources on Dynamic SQL:

    1. Below Dynamic SQL link includes: What is Dynamic SQL, Steps used in processing Dynamic SQL etc.
    MSDN

    2. Below Dynamic SQL link includes: What is Dynamic SQL?, Dynamic SQL vs. Stored Procedures, When to Use Dynamic SQL?, How we can use Dynamic SQL etc.
    Benkotips

    3. The Curse and Blessings of Dynamic SQL include: Introducing Dynamic SQL, Dynamic SQL and Stored Procedures, Good Coding Practices and Tips for Dynamic SQL, Common Cases when to (Not) Use Dynamic SQL etc.
    Sommarskog

    4. Building Dynamic SQL In a Stored Procedure includes: sp_executesql Vs EXECUTE Command, Using Like Operator, IN Operator and Order By In Dynamic SQL etc.
    Code Project

    5. Introduction to Dynamic SQL - Part-1 and Part-2

    6. Using Dynamic SQL Statements in Stored Procedures

    7. Dynamic SQL & SQL injection

    Although static SQL works well in many situations, there is a class of applications in which the data access cannot be determined in advance. For example, suppose a spreadsheet allows a user to enter a query, which the spreadsheet then sends to the DBMS to retrieve data. The contents of this query obviously cannot be known to the programmer when the spreadsheet program is written.
    To solve this problem, the spreadsheet uses a form of embedded SQL called dynamic SQL. Unlike static SQL statements, which are hard-coded in the program, dynamic SQL statements can be built at run time and placed in a string host variable. They are then sent to the DBMS for processing. Because the DBMS must generate an access plan at run time for dynamic SQL statements, dynamic SQL is generally slower than static SQL. When a program containing dynamic SQL statements is compiled, the dynamic SQL statements are not stripped from the program, as in static SQL. Instead, they are replaced by a function call that passes the statement to the DBMS; static SQL statements in the same program are treated normally.
    The simplest way to execute a dynamic SQL statement is with an EXECUTE IMMEDIATE statement. This statement passes the SQL statement to the DBMS for compilation and execution.
    One disadvantage of the EXECUTE IMMEDIATE statement is that the DBMS must go through each of the five steps of processing an SQL statement each time the statement is executed. The overhead involved in this process can be significant if many statements are executed dynamically, and it is wasteful if those statements are similar. To address this situation, dynamic SQL offers an optimized form of execution called prepared execution, which uses the following steps:
    1. The program constructs an SQL statement in a buffer, just as it does for the EXECUTE IMMEDIATE statement. Instead of host variables, a question mark (?) can be substituted for a constant anywhere in the statement text to indicate that a value for the constant will be supplied later. The question mark is called as a parameter marker.
    2. The program passes the SQL statement to the DBMS with a PREPARE statement, which requests that the DBMS parse, validate, and optimize the statement and generate an execution plan for it. The program then uses an EXECUTE statement (not an EXECUTE IMMEDIATE statement) to execute the PREPARE statement at a later time. It passes parameter values for the statement through a special data structure called the SQL Data Area or SQLDA.
    3. The program can use the EXECUTE statement repeatedly, supplying different parameter values each time the dynamic statement is executed.
    Prepared execution is still not the same as static SQL. In static SQL, the first four steps of processing an SQL statement take place at compile time. In prepared execution, these steps still take place at run time, but they are performed only once; execution of the plan takes place only when EXECUTE is called. This helps eliminate some of the performance disadvantages inherent in the architecture of dynamic SQL. The next illustration shows the differences between static SQL, dynamic SQL with immediate execution, and dynamic SQL with prepared execution.
    Show:
       

    Difference Between Rank, Dense_Rank & Row_Number

    Difference Between Rank, Dense_Rank & Row_Number


    Rank, Dense_Rank and Row_Number are ranking functions in SQL Server.

    1. The difference between rank/dense_rank and row_number is that, row_number is not deterministic when the order-by list is not unique. Rank and dense_rank are always deterministic, that is, the same ranking values are assigned to rows with same sort values.

    As per SQL Server 2016 and later all three i.e. Rank, Dense_Rank and Row_Number are Nondeterministic functions.

    2. The difference between rank and dense_rank is that rank might have gaps in the ranking values, but allows you to know how many rows have lower sort values. Dense_rank values have no gaps.

    Look at the results below - rank values are 1, 1, 1, 4, 5 (have a gap) and results of dense_rank 1, 1, 1, 2, 3 (have no gap). [Source: Inside Microsoft SQL Server 2008 T-SQL Querying: T-SQL Querying, Microsoft SQL Server 2012 Unleashed]

    3. The difference between rank and dense_rank is that rank indicates how many rows have a lower ordering value, whereas dense_rank indicates how many distinct ordering values are lower. For example, a rank of 9 indicates eight rows with lower values. A dense_rank of 9 indicates eight distinct lower values. [Source: Microsoft SQL Server Interview Questions By Chandan Sinha]

    4. Rank counts each tie as a ranked row. Dense_rank handles ties differently. Tied rows only consume a single value in the ranking, so the next rank is the next place in the ranking order. No ranks are skipped. [Source: Microsoft SQL Server 2008 Bible By Paul Nielsen, Uttam Parui]

    Very simple example depicting the difference in results of rank, dense_rank and row_number
    CREATE TABLE Z2
    (
    Name varchar(255)
    );
    
    insert into Z2 values ('a');
    insert into Z2 values ('a');
    insert into Z2 values ('a');
    insert into Z2 values ('b');
    insert into Z2 values ('c');
    
    Select * from Z2
    
           
    Name
    a
    a
    a
    b
    c


    SELECT *, Rank() over (ORDER BY Name ASC) AS rank_example FROM Z2;

    SELECT *, Dense_rank() over (ORDER BY Name ASC) AS dense_rank_example FROM Z2;

    SELECT *, Row_number() over (ORDER BY Name ASC) AS row_number_example FROM Z2;

               
    Namerank_example
    a1
    a1
    a1
    b4
    c5

               
    Namedense_rank_example
    a1
    a1
    a1
    b2
    c3

               
    Namerow_number_example
    a1
    a2
    a3
    b4
    c5

    Examples of Merge Statement’s Output Clause

    Examples of Merge Statement’s Output Clause

    We are using the same tables and merge statement as used in an example previously. Below are just four simple ways you can use output clause with the merge statement.

    Example 1 of Output clause:

    In this first example, @MergeOutput1 is declared as a table variable. It has columns for old mobile names and new mobile names. Similarly columns for old company names and new company names are there. ActionType column shows the type of modification that is performed on the table when rows are merged. Lastly it also has a MobileID column which is common to both the tables Mobiles and Mobiles_New.

    Output clause of the merge statement is inserting the values in the @MergeOutput1 variable. At last we are using select statement to view the rows of the @MergeOutput1 table variable.
    CREATE TABLE [Mobiles]
        (
          [MobileID] [int] PRIMARY KEY,
          [MobileName] [nvarchar](64),
          [Company] [nvarchar](50)
        );
       
    CREATE TABLE [Mobiles_New]
        (
          [MobileID] [int] PRIMARY KEY,
          [MobileName] [nvarchar](64),
          [Company] [nvarchar](50)
        );
       
          INSERT  INTO [Mobiles]
    VALUES  ( 1, 'Nokia 100', 'MS' )
    ,       ( 2, 'Nokia 120', 'MS' )
    ,       ( 3, 'Nokia 130', 'MS' )
    ,       ( 4, 'N72', 'Nokia' )
    ,       ( 5, 'P21', 'Panaonic' )
    ,       ( 6, 'M69', 'Micromax' );
    
    
    INSERT  INTO [Mobiles_New]
    VALUES  ( 1, 'Microsoft 100', 'Microsoft' )
    ,       ( 2, 'Microsoft 120', 'Microsoft' )
    ,       ( 3, 'Microsoft 130', 'Microsoft' )
    ,       ( 4, 'Nokia 72', 'Microsoft' )
    ,       ( 7, 'iPhone', 'Apple' );
    
    Select * from Mobiles
    Select * from Mobiles_New
    
    
    DECLARE @MergeOutput1 table
    
    (
    
      ActionType nvarchar(10),
      MobileID int,
      OldMobileName nvarchar(65),
      NewMobileName nvarchar(65),
      OldCompany nvarchar(55),
      NewCompany nvarchar(55)
    
    );
    MERGE [dbo].[Mobiles] AS [OLD_Tbl]
    USING [dbo].[Mobiles_New] AS [New_Tbl]
    ON ( OLD_Tbl.[MobileID] = New_Tbl.[MobileID] )
    WHEN MATCHED AND OLD_Tbl.[MobileName] <>
    New_Tbl.[MobileName]
        OR OLD_Tbl.[Company] <> New_Tbl.[Company] THEN
        UPDATE SET OLD_Tbl.[MobileName] = New_Tbl.[MobileName]
    ,
                   OLD_Tbl.[Company] = New_Tbl.[Company]
    WHEN NOT MATCHED THEN
        INSERT ( [MobileID] ,
                 [MobileName] ,
                 [Company]
               )
        VALUES ( New_Tbl.[MobileID] ,
                 New_Tbl.[MobileName] ,
                 New_Tbl.[Company]
               )
    WHEN NOT MATCHED BY SOURCE THEN
        DELETE
    OUTPUT
        $Action ,
        INSERTED.MobileID,
        DELETED.MobileName,
        Inserted.MobileName,
        DELETED.Company,
        Inserted.Company
          INTO @MergeOutput1;
    
    Select * from @MergeOutput1;
    

    Result:


    Example 2 of Output clause:

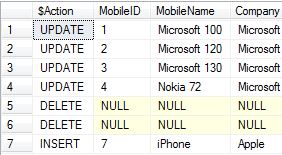
    INSERTED is a column prefix that specifies the value added by the insert or update operation. In simple words when using output clause, a table called the inserted table is created for all the insert operations. A table called the deleted table is created for delete operations.

    Here we are showing all three columns i.e. MobileID, MobileName and Company using "INSERTED" column prefix with "*".

    Drop table Mobiles
    Drop table Mobiles_New
    
    CREATE TABLE [Mobiles]
        (
          [MobileID] [int] PRIMARY KEY,
          [MobileName] [nvarchar](64),
          [Company] [nvarchar](50)
        );
       
    CREATE TABLE [Mobiles_New]
        (
          [MobileID] [int] PRIMARY KEY,
          [MobileName] [nvarchar](64),
          [Company] [nvarchar](50)
        );
       
          INSERT  INTO [Mobiles]
    VALUES  ( 1, 'Nokia 100', 'MS' )
    ,       ( 2, 'Nokia 120', 'MS' )
    ,       ( 3, 'Nokia 130', 'MS' )
    ,       ( 4, 'N72', 'Nokia' )
    ,       ( 5, 'P21', 'Panaonic' )
    ,       ( 6, 'M69', 'Micromax' );
    
    
    INSERT  INTO [Mobiles_New]
    VALUES  ( 1, 'Microsoft 100', 'Microsoft' )
    ,       ( 2, 'Microsoft 120', 'Microsoft' )
    ,       ( 3, 'Microsoft 130', 'Microsoft' )
    ,       ( 4, 'Nokia 72', 'Microsoft' )
    ,       ( 7, 'iPhone', 'Apple' );
    
    Select * from Mobiles
    Select * from Mobiles_New
    
    MERGE [dbo].[Mobiles] AS [OLD_Tbl]
    USING [dbo].[Mobiles_New] AS [New_Tbl]
    ON ( OLD_Tbl.[MobileID] = New_Tbl.[MobileID] )
    WHEN MATCHED AND OLD_Tbl.[MobileName] <>
    New_Tbl.[MobileName]
        OR OLD_Tbl.[Company] <> New_Tbl.[Company] THEN
        UPDATE SET OLD_Tbl.[MobileName] = New_Tbl.[MobileName]
    ,
                   OLD_Tbl.[Company] = New_Tbl.[Company]
    WHEN NOT MATCHED THEN
        INSERT ( [MobileID] ,
                 [MobileName] ,
                 [Company]
               )
        VALUES ( New_Tbl.[MobileID] ,
                 New_Tbl.[MobileName] ,
                 New_Tbl.[Company]
               )
    WHEN NOT MATCHED BY SOURCE THEN
        DELETE
    OUTPUT
        $Action,
        INSERTED.*;
    

    Result:


    Example 3 of Output clause:

    Here, in this example, instead of using "*" to show all the columns we have used "." to show individual columns which we want to see in the result.

    Drop table Mobiles
    Drop table Mobiles_New
    
    CREATE TABLE [Mobiles]
        (
          [MobileID] [int] PRIMARY KEY,
          [MobileName] [nvarchar](64),
          [Company] [nvarchar](50)
        );
       
    CREATE TABLE [Mobiles_New]
        (
          [MobileID] [int] PRIMARY KEY,
          [MobileName] [nvarchar](64),
          [Company] [nvarchar](50)
        );
       
          INSERT  INTO [Mobiles]
    VALUES  ( 1, 'Nokia 100', 'MS' )
    ,       ( 2, 'Nokia 120', 'MS' )
    ,       ( 3, 'Nokia 130', 'MS' )
    ,       ( 4, 'N72', 'Nokia' )
    ,       ( 5, 'P21', 'Panaonic' )
    ,       ( 6, 'M69', 'Micromax' );
    
    
    INSERT  INTO [Mobiles_New]
    VALUES  ( 1, 'Microsoft 100', 'Microsoft' )
    ,       ( 2, 'Microsoft 120', 'Microsoft' )
    ,       ( 3, 'Microsoft 130', 'Microsoft' )
    ,       ( 4, 'Nokia 72', 'Microsoft' )
    ,       ( 7, 'iPhone', 'Apple' );
    
    Select * from Mobiles
    Select * from Mobiles_New
    
    MERGE [dbo].[Mobiles] AS [OLD_Tbl]
    USING [dbo].[Mobiles_New] AS [New_Tbl]
    ON ( OLD_Tbl.[MobileID] = New_Tbl.[MobileID] )
    WHEN MATCHED AND OLD_Tbl.[MobileName] <>
    New_Tbl.[MobileName]
        OR OLD_Tbl.[Company] <> New_Tbl.[Company] THEN
        UPDATE SET OLD_Tbl.[MobileName] = New_Tbl.[MobileName]
    ,
                   OLD_Tbl.[Company] = New_Tbl.[Company]
    WHEN NOT MATCHED THEN
        INSERT ( [MobileID] ,
                 [MobileName] ,
                 [Company]
               )
        VALUES ( New_Tbl.[MobileID] ,
                 New_Tbl.[MobileName] ,
                 New_Tbl.[Company]
               )
    WHEN NOT MATCHED BY SOURCE THEN
        DELETE
    OUTPUT
        $Action,
        INSERTED.MobileID,
        INSERTED.MobileName,
        INSERTED.Company;
    

    Result:


    Example 4 of Output clause:

    You can refer any column of the source table (Mobiles_New in our case) in the merge statement's output clause.
    Drop table Mobiles
    Drop table Mobiles_New
    
    CREATE TABLE [Mobiles]
        (
          [MobileID] [int] PRIMARY KEY,
          [MobileName] [nvarchar](64),
          [Company] [nvarchar](50)
        );
       
    CREATE TABLE [Mobiles_New]
        (
          [MobileID] [int] PRIMARY KEY,
          [MobileName] [nvarchar](64),
          [Company] [nvarchar](50)
        );
       
          INSERT  INTO [Mobiles]
    VALUES  ( 1, 'Nokia 100', 'MS' )
    ,       ( 2, 'Nokia 120', 'MS' )
    ,       ( 3, 'Nokia 130', 'MS' )
    ,       ( 4, 'N72', 'Nokia' )
    ,       ( 5, 'P21', 'Panaonic' )
    ,       ( 6, 'M69', 'Micromax' );
    
    
    INSERT  INTO [Mobiles_New]
    VALUES  ( 1, 'Microsoft 100', 'Microsoft' )
    ,       ( 2, 'Microsoft 120', 'Microsoft' )
    ,       ( 3, 'Microsoft 130', 'Microsoft' )
    ,       ( 4, 'Nokia 72', 'Microsoft' )
    ,       ( 7, 'iPhone', 'Apple' );
    
    Select * from Mobiles
    Select * from Mobiles_New
    
    MERGE [dbo].[Mobiles] AS [OLD_Tbl]
    USING [dbo].[Mobiles_New] AS [New_Tbl]
    ON ( OLD_Tbl.[MobileID] = New_Tbl.[MobileID] )
    WHEN MATCHED AND OLD_Tbl.[MobileName] <>
    New_Tbl.[MobileName]
        OR OLD_Tbl.[Company] <> New_Tbl.[Company] THEN
        UPDATE SET OLD_Tbl.[MobileName] = New_Tbl.[MobileName]
    ,
                   OLD_Tbl.[Company] = New_Tbl.[Company]
    WHEN NOT MATCHED THEN
        INSERT ( [MobileID] ,
                 [MobileName] ,
                 [Company]
               )
        VALUES ( New_Tbl.[MobileID] ,
                 New_Tbl.[MobileName] ,
                 New_Tbl.[Company]
               )
    WHEN NOT MATCHED BY SOURCE THEN
        DELETE
    OUTPUT
        $Action,
        INSERTED.MobileID,
        INSERTED.MobileName,
        INSERTED.Company,
        New_Tbl.MobileID;   
    

    Result:

    Stored Procedure

    The syntax of the stored procedure:

    CREATE { PROC | PROCEDURE } [schema_name.] procedure_name [ ; number ] 
        [ { @parameter [ type_schema_name. ] data_type } 
            [ VARYING ] [ = default ] [ OUT | OUTPUT ] [READONLY]
        ] [ ,...n ] 
    [ WITH  [ ,...n ] ]
    [ FOR REPLICATION ] 
    AS { [ BEGIN ] sql_statement [;] [ ...n ] [ END ] }
    [;]
    
     ::= 
        [ ENCRYPTION ]
        [ RECOMPILE ]
        [ EXECUTE AS Clause ]
    

    For more on syntax see here

    Stored procedures are similar to procedures in other programming languages in that they can:
    -Accept input parameters and return multiple values in the form of output parameters to the calling procedure or batch.
    -Contain programming statements that perform operations in the database, including calling other procedures.
    -Return a status value to a calling procedure or batch to indicate success or failure (and the reason for failure).

    Example 1 of stored procedure

    Below is a simple stored procedure

    Create Procedure dbo.my_first_sp
    As
    select * from Employees
    Go 
    
    After writing the above text select it and press F5 in SQL Server. This stored procedure will be added under stored procedures(I am currently working with Northwind Database. Under Northwind Database, expand Programmability and expand stored procedures, you will see this new stored procedure my_first_sp).

    In order to run it. Simply type

    my_first_sp
    
    Select it and press F5 or type
    
    Exec my_first_sp
    
    Select it and press F5.


    Example 2 of stored procedure

    Below is a simple stored procedure to show the employees by title of courtesy (Mr., Mrs., Dr. etc)

    Create Procedure dbo.empbytitleofcourtesy @toc nvarchar(5)
    As
    select * from Employees
    where TitleOfCourtesy = @toc
    Go
    

    Once you create this stored procedure, run it (select it and press F5). This stored procedure will be added under stored procedures(I am currently working with Northwind Database. Under Northwind Database, expand Programmability and expand stored procedures, you will see this new stored procedure empbytitleofcourtesy).

    To run this stored procedure type:

    Exec dbo.empbytitleofcourtesy 'Dr.'

    And press F5.

    We are passing one parameter ‘Dr.’(We want to see all employees who are doctors) to the stored procedure.

    Example 3 of stored procedure

    A simple stored procedure with 2 parameters

    Create Procedure dbo.sp_two_parameters @fn varchar(20), @ln varchar (20)
    As
    select * from Employees
    where FirstName = @fn and LastName = @ln
    Go 
     
    Call the above stroed procedure as 
    sp_two_parameters 'Robert', 'King'


    Example 4 of stored procedure

    A simple stored procedure to insert rows into a table:

    Create Procedure dbo.sp_insert @empid int, @nm varchar(20), @mng varchar(20)
    As
    Insert into employee values (@empid, @nm, @mng)
    Go
    

    Call the above stroed procedure as

    sp_insert 4, 'ddd', 3

    Example 5 of stored procedure

    Example of stored procedure returning value

    Create procedure sp_oparam @eid int, @nm varchar(20) output
    As
    Begin
    Select @nm=Name 
    from employee
    where Emp_id = @eid
    End
    Go
    
    DECLARE @Thename varchar(20)
    Exec sp_oparam 3, @nm=@Thename output 
    select Thename = @Thename
    Go
    

    Example 6 of stored procedure

    Example of stored procedure returning 2 values

    Create procedure sp_oparam @eid int, @nm varchar(20) output, @mngr int output
    As
    Begin
    Select @nm=Name, @mngr=Manager 
    from employee
    where Emp_id = @eid
    End
    Go
    
    DECLARE @Thename varchar(20), @Themanager int
    Exec sp_oparam 2, @nm=@Thename output,  @mngr=@Themanager output 
    select Thename = @Thename
    select Themanager = @Themanager
    Go
    

    Example 7 of stored procedure

    Another way to get data back from a stored procedure is by using Return. It only returns a single numeric value. Mostly this is used to return a status result or error code.


    Alter procedure sp_ret @Mid int
    As
    Begin
     DECLARE @RetVal INT
     Select @RetVal=Emp_id from employee
     Where Manager = @Mid
    if @RetVal = 4
     Begin
     Return 1
     End
    End 
    
    
    DECLARE @ReturnValue int
    Exec @ReturnValue = sp_ret 3
    select ReturnValue=@ReturnValue

    Altering Stored Procedure
    You alter stored procedure with ALTER PROCEDURE command. Advantage of using ALTER PROCEDURE to change a stored procedure is that it preserves access permissions, whereas CREATE PROCEDURE doesn't. A key difference between them is that ALTER PROCEDURE requires the use of the same encryption and recompile options as the original CREATE PROCEDURE statement.

    Example 8 of stored procedure

    Below is a simple example of stored procedure

    CREATE procedure [dbo].[sp_willbechanged] @eid int 
    As
    Begin
    Select Name, Manager 
    from employee
    where Emp_id = @eid
    End 
    
    Call the above stored procedure for example like below:
    sp_willbechanged 2

    Now if you want to modify the stored procedure and show only the Name and NOT Manager, you will do as below:

    Alter procedure [dbo].[sp_willbechanged] @eid int 
    As
    Begin
    Select Name 
    from employee
    where Emp_id = @eid
    End
     
    
    You will still continue to call this as you called the above one.

    Example 9 of stored procedure

    Below is an example of how to call one stored procedure from another stored procedure.

    CREATE procedure [dbo].[sp_oparam1] @eid int, @nm varchar(20) output
    As
    Begin
     Select @nm=Name
     from employee
     where Emp_id = @eid
    End
    GO
    
    Alter procedure [dbo].[sp_calloparam1] @eid1 int
    As
    Begin
     DECLARE @Thename varchar(20)
     Exec sp_oparam1 @eid1, @nm=@Thename output
    If @Thename = 'aaa'
     Begin
      Return 5
     End 
    End 
    Go
    
    Call sp_calloparam1 like below:
    
    DECLARE @ReturnValue INT
    EXEC @ReturnValue = sp_calloparam1 3
    SELECT ReturnValue=@ReturnValue
    

    How to list the source code of stored procedure?

    Use sp_helptext to list the source code of the stored procedure.


    How to find the creation and modification date of stored procedure?

    PL/SQL Triggers

    PL/SQL Triggers
    A PL/SQL trigger is a construct in PL/SQL that runs or "triggered" on event of changes being made to a table in the database. The triggering event is a INSERT, UPDATE or DELETE done on a table. The trigger can be made so it can be "fired" either BEFORE or AFTER the Data Manipulation Language is executed.

    > A database trigger is a block of code that is automatically executed in response to certain events.

    > Triggers are executed implicitly whenever the triggering event happens.

    > The triggering event is an INSERT, DELETE, or UPDATE command.

    > The timing can be either BEFORE or AFTER, INSTEAD OF trigger.

    The trigger can be either row-level or statement-level, where the former fires once for each row affected by the triggering statement and the latter fires once for the whole statement.

    You can write triggers that fire whenever one of the following operations occurs:

    1. DML statements (INSERT, UPDATE, DELETE) on a particular table or view, issued by any user
    2. DDL statements (CREATE or ALTER primarily) issued either by a particular schema/user or by any schema/user in the database
    3. Database events, such as logon/logoff, errors, or startup/shutdown, also issued either by a particular schema/user or by any schema/user in the database

    A trigger has three basic parts:

    • A triggering event or statement
    • A trigger restriction
    • A trigger action

    Example of PL/SQL trigger

    In the below example line 2 is A triggering event or statement, lines 4-9 are A trigger action.

    Example of creating a trigger based on the following two tables:

    CREATE TABLE T1 (a INTEGER);
    CREATE TABLE T2 (b INTEGER);

    We will create a trigger that may insert a tuple into T2 when a tuple is inserted into T1. The trigger checks if the inserted row in T1 is has a value less than 5 only then a tuple is inserted in T2.

    1 CREATE TRIGGER tr1
    2 AFTER INSERT ON T1
    3 REFERENCING NEW AS newRow
    4 FOR EACH ROW
    5 WHEN (newRow.a <= 5)
    6 BEGIN
    7 INSERT INTO T2
    VALUES(:newRow.a);
    8 END tr1;
    9 .
    10 run;


    Different types of triggers can be:

    Row Triggers and Statement Triggers: A statement trigger is fired once on behalf of the triggering statement, regardless of the number of rows in the table that the triggering statement affects. A row trigger fires once for each row affected by the triggering event.

    BEFORE and AFTER Triggers: BEFORE triggers run the trigger action before the triggering statement is run. AFTER triggers run the trigger action after the triggering statement is run.

    INSTEAD OF Triggers: INSTEAD OF triggers describe how to perform insert, update, and delete operations against views that are too complex to support these operations natively. INSTEAD OF triggers allow applications to use a view as the sole interface for all SQL operations (insert, delete, update and select).

    Triggers on System Events and User Events: You can use triggers to publish information about database events to subscribers. System events are for example Database startup and shutdown, Data Guard role transitions etc and User Events are User logon and logoff, DDL statements (CREATE, ALTER, and DROP) etc.

    Displaying Trigger Errors

    If we get a message Warning: Trigger created with compilation errors. you can check the error messages with:

    Show errors trigger <trigger_name>;

    You can also type, SHO ERR (SHOW ERRORS) to see the most recent compilation error.

    Viewing Defined Triggers

    To view all the defined triggers, use:

    select name_of_trigger from user_triggers;

    For more details on a particular trigger:

    select trigger_type, triggering_event, table_name, referencing_names, trigger_body
    from user_triggers
    where trigger_name = '<name_of_trigger>';

    Disabling Triggers

    To disable or enable a trigger:

    alter trigger <name_of_trigger> {disable | enable};

    PL/SQL Procedures

    PL/SQL Procedures
    There are two types of PL/SQL blocks: named block and an anonymous block.
    There are two types of named blocks: Functions and Procedures

    A stored procedure is a PL/SQL block that accepts zero or more parameters as input (IN), output (OUT), or both (INOUT). PL/SQL Procedures do not return a value; instead the INOUT parameter or OUT parameter may be used to pass a value from the procedure. Procedures cannot be used in SQL statements; they are invoked using the EXECUTE command or called inside a PL/SQL block.

    Syntax of PL/SQL Procedure:
    PROCEDURE name [(parameter[, parameter, …])] IS
    [local declarations]
    BEGIN
    executable statements
    [EXCEPTION
    exception handlers]
    END [name];
    

    Example 1 of PL/SQL Procedure

    create or replace procedure get_area
    (Len in number, Wid in number, Area out number)
    as
    begin
    Area := Len * Wid;
    end;

    SQL> variable area1 number;
    SQL> execute get_area (10, 50, :area1);
    PL/SQL procedure successfully completed.
    SQL> print area1
    AREA1
    ---------
    500

    Example 2 of PL/SQL Procedure

    The following statement creates the procedure remove_emp in the schema hr. The PL/SQL is shown in italics:

    CREATE PROCEDURE remove_emp (employee_id NUMBER) AS
    tot_emps NUMBER;
    BEGIN
    DELETE FROM employees
    WHERE employees.employee_id = remove_emp.employee_id;
    tot_emps := tot_emps - 1;
    END;
    /


    The remove_emp procedure removes a specified employee. When you call the procedure, you must specify the employee_id of the employee to be removed.

    The procedure uses a DELETE statement to remove from the employees table the row of employee_id. [Via]

    Difference between Nested & Correlated Subqueries

    There are two main types of subqueries - nested and correlated. Subqueries are nested, when the subquery is executed first,and its results are inserted into Where clause of the main query. Correlated subqueries are the opposite case, where the main query is executed first and the subquery is executed for every row returned by the main query.[Via: Sql By Leon]

    Nested Subqueries
    A subquery is nested when you are having a subquery in the where or having clause of another subquery.

    Get the result of all the students who are enrolled in the same course as the student with ROLLNO 12.
    Select *
    From result
    where rollno in (select rollno
                     from student
                     where courseid = (select courseid
                                       from student
                                       where rollno = 12));
    
    The innermost subquery will be executed first and then based on its result the next subquery will be executed and based on that result the outer query will be executed. The levels to which you can do the nesting is implementation-dependent.

    Correlated Subquery

    A Correlated Subquery is one that is executed after the outer query is executed. So correlated subqueries take an approach opposite to that of normal subqueries. The correlated subquery execution is as follows:

    -The outer query receives a row.
    -For each candidate row of the outer query, the subquery (the correlated subquery) is executed once.
    -The results of the correlated subquery are used to determine whether the candidate row should be part of the result set.
    -The process is repeated for all rows.

    Correlated Subqueries differ from the normal subqueries in that the nested SELECT statement referes back to the table in the first SELECT statement.

    To find out the names of all the students who appeared in more than three papers of their opted course, the SQL will be
    Select name
    from student A
    Where 3 < (select count (*)
               from result b
               where b.rollno = a.rollno);
    
    In other words, a correlated subquery is one whose value depends upon some variable that receives its value in some outer query. A non-correlated subquery as said before is evaluted in a bottom-to-up manner, i.e. the inner most query is evaluated first. But a correlated subquery is resolved in a top-to-bottom fashion. The top most query is analyzed and based on that result the next query is initiated. Such a subquery has to be evaluated repeatedly, once for each value of the variable in question, instead of once and for all.

    Correlated subqueries improve the SQL performance when:
    Only a few rows are retrieved through the outer query and especially when outer query's WHERE clause, which limits the number of rows retrieved, can use an index.

    The correlated inner queries are performed through an index scan. This is very important if the table or tables against which the inner query is performed is large and the index scan has to retrieve only a small percentage of its rows.

    In other cases views and joins are likely to be more efficient. But the only sure way to say which method is efficient is to analyze the execution plan of the query and the resources used by it. [via:Introduction to Database Management Systems By Isrd Group]

    Cursors--

    Implicit cursors
    Implicit cursors are automatically created and used by Oracle every time you issue a Select statement in PL/SQL. If you use an implicit cursor, Oracle will perform the open, fetches, and close for you automatically. Implicit cursors are used in statements that return only one row. If the SQL statement returns more than one row, an error will occur.

    The Oracle server implicitly opens a cursor to process each SQL statement not associated with an explicitly declared cursor. PL/SQL allows you to refer to the most recent implicit cursor as the SQL cursor.

    For a long time there have been debates over the relative merits of implicit cursors and explicit cursors. The short answer is that implicit cursors are faster and result in much neater code so there are very few cases where you need to resort to explicit cursor.

    The process of an implicit cursor is as follows:

    1. Whenever an SQL statement is executed, any given PL/SQL block issues an implicit cursor, as long as an explicit cursor does not exist for that SQL statement.
    2. A cursor is automatically associated with every DML statement (UPDATE, DELETE, and INSERT).
    3. All UPDATE and DELETE statements have cursors those recognize the set of rows that will be affected by the operation.
    4. An INSERT statement requires a place to accept the data that is to be inserted in the database; the implicit cursor fulfills this need.
    5. The most recently opened cursor is called the “SQL%” Cursor.

    The implicit cursor is used to process INSERT, UPDATE, DELETE, and SELECT INTO statements. Oracle automatically performs the OPEN, FETCH, and CLOSE operations, during the processing of an implicit cursor.

    Example 1 of an Implicit cursors

    In the following PL/SQL code block, the select statement makes use of an implicit cursor:

    Begin
    Update emp Where 1=2;
    Dbms_output.put_line (sql%rowcount ||’ ‘|| ‘ rows are affected by the update statement’);
    End;
    SELECT SUM (sal) INTO TOTAL
    FROM emp
    WHERE depno = 10;

    Another Example of an Implicit cursor

    The following single-row query calculates and returns the total salary for a department. PL/SQL creates an implicit cursor for this statement:

    SELECT SUM (salary) INTO department_total
    FROM employee
    WHERE department_number = 10;


    PL/SQL provides some attributes, which allow you to evaluate what happened when the implicit cursor was last used. You can use these attributes in PL/SQL statements like functions but you cannot use then within SQL statements.

    %ROWCOUNTThe number of rows processed by a SQL statement.
    %FOUNDTRUE if at least one row was processed.
    %NOTFOUNDTRUE if no rows were processed.
    %ISOPENTRUE if cursor is open or FALSE if cursor has not been opened or has been closed. Only used with explicit cursors.


    An Example of PL/SQL Attribute

    DECLARE
    rows_deleted NUMBER;
    BEGIN
    DELETE * FROM emp;
    rows_deleted := SQL%ROWCOUNT;
    END;


    The implicit cursor has the following drawbacks:
    • It is less efficient than an explicit cursor.
    • It is more vulnerable to data errors.
    • It gives you less programmatic control.

    Please see this link to know if Implicit cursors are fast or Explicit cursors.

    Explicit Cursors
    Programmers create explicit cursors, and with these you can do operations on a set of rows, which can be processed one by one. You use explicit cursors when you are sure that the SQL statement will return more than one row. You have to declare an explicit cursor in the declare section at the beginning of the PL/SQL block.

    Use explicit cursors to individually process each row returned by a multiple-row SELECT statement.

    Explicit cursor functions:
    • Can process beyond the first row returned by the query, row by row
    • Keep track of which row is currently being processed
    • Allow the programmer to manually control explicit cursors in the PL/SQL block
    Once you declare your cursor, the explicit cursor will go through these steps:

    Declare: This clause initializes the cursor into memory.
    Open: The previously declared cursor is now open and memory is allotted.
    Fetch: The previously declared and opened cursor can now access data;
    Close: The previously declared, opened, and fetched cursor is closed, which also releases memory allocation.

    Below is a small example of an Explicit cursor:

    SQL> set serveroutput on;
    SQL> Declare
    2 Cursor empcursor(empn in number)
    3 Is select * from emp where empno=empn;
    4
    5 empvar emp%rowtype;
    6 Begin
    7 Dbms_output.put_line('Getting records for employee no. 7521');
    8 Open empcursor(7521);
    9 Loop
    10 Fetch empcursor into empvar;
    11 Exit when empcursor%notfound;
    12 Dbms_output.put_line('emp name : ' || empvar.ename);
    13 Dbms_output.put_line('emp salary : ' || empvar.sal);
    14 End loop;
    15 Close empcursor;
    16 End;
    17 /
    Getting records for employee no. 7521
    emp name : WARD
    emp salary : 1250

    PL/SQL procedure successfully completed.


    Explicit Cursor Attributes

    Here are the main cursor attributes:

    %ISOPENIt returns TRUE if cursor is open, and FALSE if it is not.
    %FOUNDIt returns TRUE if the previous FETCH returned a row and FALSE if it did not.
    %NOTFOUNDIt returns TRUE if the previous FETCH did not return a row and FALSE if it did.
    %ROWCOUNTIt gives you the number of rows the cursor fetched so far.


    Few more examples of Explicit Cursors:

    Example 1 of an Explicit Cursor:

    An example to retrieve the first 10 employees one by one.

    SET SERVEROUTPUT ON
    DECLARE
    v_empno employees.employee_id%TYPE;
    v_ename employees.last_name%TYPE;
    CURSOR emp_cursor IS
    SELECT employee_id, last_name
    FROM employees;
    BEGIN
    OPEN emp_cursor;
    FOR i IN 1..10 LOOP
    FETCH emp_cursor INTO v_empno, v_ename;
    DBMS_OUTPUT.PUT_LINE (TO_CHAR(v_empno)
    ||' '|| v_ename);
    END LOOP;
    Close emp_cursor
    END ;

    Example 2 of an Explicit Cursor:

    DECLARE

    CURSOR csr_ac (p_name VARCHAR2) IS
    SELECT empno, name, sal
    FROM employee
    WHERE name LIKE '%p_name%';

    BEGIN

    FOR rec_ac IN csr_ac ('LE')
    LOOP
    DBMS_OUTPUT.PUT_LINE(rec_ac.empno || ' ' ||rec_ac.name || ' '||v_sal);
    END LOOP ;

    CLOSE csr_ac;

    END;

    Example 3 of an Explicit Cursor:

    Another way of writing the above code, is to use the basic loop and the SQL%NOTFOUND cursor, as shown in the following.

    DECLARE
    CURSOR csr_ac (p_name VARCHAR2) IS
    SELECT empno, ename, sal
    FROM emp

    WHERE ename LIKE '%SMITH%';

    v_a emp.empno%TYPE;
    v_b emp.ename%TYPE;
    v_c emp.sal%TYPE;

    BEGIN
    OPEN csr_ac('');
    LOOP
    FETCH csr_ac INTO v_a, v_b, v_c;
    EXIT WHEN csr_ac%NOTFOUND;

    DBMS_OUTPUT.PUT_LINE(v_a || ' ' || v_b || ' '||v_c);

    END LOOP;
    CLOSE csr_ac;
    END;

     RSS Feed

    Oracle PL/SQL Cursor For Loops

    Cursor For Loop

    The following procedure is followed in most of the situations in PL/SQL:

    1. Open a cursor
    2. Start a loop
    3. Fetch the cursor
    4. Check whether rows are returned
    5. Process
    6. Close the loop
    7. Close the cursor


    Cursor For Loop allows us to simplify this procedure by letting PL/SQL do most of the things for us.

    You can simplify coding by using a Cursor For Loop instead of the OPEN, FETCH, and CLOSE statements.

    A Cursor For Loop implicitly declares its loop index as a record that represents a row fetched from the database.

    Next, it opens a cursor, repeatedly fetches rows of values from the result set into fields in the record, and then closes the cursor when all rows have been processed.

    Cursor For Loop Example

    DECLARE CURSOR c1 IS
    SELECT ename, sal, deptno
    FROM emp;
    ...
    BEGIN
    FOR emp_rec IN c1 LOOP
    ...
    salary_total := salary_total +
    emp_rec.sal;
    END LOOP;

    Another example of Cursor For Loop


    Let us rewrite the example (used in Cursors with Parameters) again using Cursor For Loop


    Oracle PL/SQL Cursors With Parameters

    Cursors With Parameters
    We can pass parameters into a cursor and use them in the query.

    We can only pass values to the cursor; and cannot pass values out of the cursor through parameters.

    Only the datatype of the parameter is defined, not its length.

    Optionally, we can also give a default value for the parameter, which will take effect if no value is passed to the cursor.

    Cursors With Parameters Example

    The following cursor prints department number and name in one line followed by employees working in that department (name and salary) and total salary.

    DECLARE
    CURSOR cur_dept IS SELECT * FROM dept ORDER BY deptno;
    CURSOR cur_emp (par_dept VARCHAR2) IS
    SELECT ename, salary
    FROM emp
    WHERE deptno = par_dept
    ORDER BY ename;

    r_dept DEPT%ROWTYPE;
    var_ename EMP.ENAME%TYPE;
    var_salary EMP.SALARY%TYPE;
    var_tot_salary NUMBER (10,2);

    BEGIN
    OPEN cur_dept;
    LOOP
    FETCH cur_dept INTO r_dept;
    EXIT WHEN cur_dept%NOTFOUND;
    DBMS_OUTPUT.PUT_LINE ('Department : ' || r_dept.deptno || ' - '|| r_dept.dname);
    var_tot_salary := 0;
    OPEN cur_emp (r_dept.deptno);
    LOOP
    FETCH cur_emp INTO var_ename, var_salary;
    EXIT WHEN cur_emp%NOTFOUND;
    DBMS_OUTPUT.PUT_LINE ('Name: ' ||var_ename || ' Salary:'||var_salary);
    var_tot_salary := var_tot_salary + var_salary;
    END LOOP;
    CLOSE cur_emp;
    DBMS_OUTPUT.PUT_LINE ('Total Salary for Dept: ' || var_tot_salary);
    END LOOP;
    CLOSE cur_dept;
    END;
    /

    Important points to keep in mind for parameters in cursors are:
    • The mode of the parameters can only be IN.
    • Cursor becomes more reusable with Cursor parameters.
    • Default values can be assigned to Cursor parameters.
    • The scope of the cursor parameters is local to the cursor.
    REF Cursors

    A REF CURSOR or cursor variable is just a reference or a handle to a static cursor. It allows a user to pass this "reference to the same cursor" among all the programs that need access to the cursor. Cursor variables give you easy access to centralized data retrieval.

    There are two types of cursor variables:

    Strong REF Cursor and
    Weak REF Cursor


    What is the difference between Cursor and REF Cursor, and when would you appropriately use each of these?

    Technically, under the covers, at the most "basic level", they are the same.

    A "normal" PL/SQL cursor is static in definition.

    Ref cursors may be dynamically opened or opened based on logic.

    Declare
    type rc is ref cursor;
    cursor c is select * from dual;
    l_cursor rc;
    begin
    if (to_char(sysdate,'dd') = 30 ) then
    open l_cursor for 'select * from emp';
    elsif ( to_char(sysdate,'dd') = 29 ) then
    open l_cursor for select * from dept;
    else
    open l_cursor for select * from dual;
    end if;
    open c;
    end;
    /
    • Given that block of code - you see perhaps the most "salient" difference - no matter how many times you run that block - cursor C will always be select * from dual. The ref cursor can be anything.
    • Another difference is a ref cursor can be returned to a client. A PL/SQL cursor cannot be returned to a client.
    • Another difference is a cursor can be global - a ref cursor cannot (you cannot define them OUTSIDE of a procedure / function).
    • Another difference is a ref cursor can be passed from subroutine to subroutine - a cursor cannot be.
    • Another difference is that static SQL (not using a ref cursor) is much more efficient then using ref cursors and that use of ref cursors should be limited to.
      • returning result sets to clients
      • when there is NO other efficient/effective means of achieving the goal. That is, you want to use static SQL (with implicit cursors really) first and use a ref cursor only when you absolutely have to.

    A ref cursor is a variable, defined as a cursor type, which will point to, or reference a cursor result. The advantage that a ref cursor has over a plain cursor is that is can be passed as a variable to a procedure or a function. The ref cursor can be assigned to other ref cursor variables. This is a powerful capability in that the cursor can be opened, then passed to another block for processing, then returned to the original block to be closed. The cursor variable can also be returned by a function and assigned to another variable. The ref cursor variable is not a cursor, but a variable that points to a cursor. Before assigning a cursor variable, a cursor type must be defined.

    type author_cursor is ref cursor;

    This "REF CURSOR" is a weak typed cursor variable because it does not define the datatype the cursor will return. Below is the same cursor that is strongly typed.

    type author_cursor is ref cursor
    returning author%rowtype;

    By strongly typing the cursor variable, you define what the cursor can return. If a strongly typed cursor returns something other that its return type, a "ROWTYPE_MISMATCH" exception is raised. A strongly typed cursor type is less flexible but less prone to programming errors. The PL/SQL compiler will verify that the "FETCH clause" has the correct variable/record for the cursor return type at compile time.

    Once the cursor type is defined, the actual variable can be defined as the cursor type.

    c1 author_cursor;

    Now c1 is a variable of a cursor type. It is opened using a SQL statement.

    open c1 for select * from authors;

    Now c1 has all the attributes of the actual cursor. As with any cursor it is important to close the cursor as soon as you have completed processing.

    SQL> declare
    2 type auth_cursor is ref cursor;
    3 c1 auth_cursor;
    4 r_c1 author%rowtype;
    5 begin
    6 open c1 for select * from author;
    7 fetch c1 into r_c1;
    8 if c1%isopen then
    9 dbms_output.put_line('The Cursor is open.');
    10 end if;
    11 dbms_output.put_line('Row Count is '||c1%rowcount);
    12 close c1;
    13 if not c1%isopen then
    14 dbms_output.put_line('The Cursor is closed.');
    15 end if;
    16 end;
    17 /


    The Cursor is open.
    Row Count is 1
    The Cursor is closed.

    Here some of the cursor attributes are used to process the cursor. Notice that the record used to hold a fetched cursor row is defined as an author table "%rowtype". Even though the example cursor variable is defined, the record can not use it because the cursor variable return type is not defined. The example below attempts to create a cursor %rowtype variable for processing.

    SQL> declare
    2 type auth_cursor is ref cursor;
    3 c1 auth_cursor;
    4 r_c1 c1%rowtype;
    5 begin
    6 null;
    7 end;
    8 /
    r_c1 c1%rowtype;
    *
    ERROR at line 4:
    ORA-06550: line 4, column 8:
    PLS-00320: the declaration of the type of this
    expression is incomplete or malformed
    ORA-06550: line 4, column 8:
    PL/SQL: Item ignored

    However, a strongly typed cursor can use the cursor variable to define the cursor record.

    SQL> declare
    2 type auth_cursor is ref cursor return author%rowtype;
    3 c1 auth_cursor;
    4 r_c1 c1%rowtype;
    5 begin
    6 null;
    7 end;
    8 /

    In this example, the auth_cursor type returns an author%rowtype. Because this is defined in line 2, the record defined in line 4 can now use it.

    Cursor variables that are weakly typed can be defined to return any values. In the example below, the cursor variable c1 is defined as three different statements.

    SQL> declare
    2 type auth_cursor is ref cursor;
    3 c1 auth_cursor;
    4 r_c1 author%rowtype;
    5 r2_c1 book%rowtype;
    6 r3_c1 number;
    7 begin
    8 open c1 for select * from author;
    9 fetch c1 into r_c1;
    10 close c1;
    11 open c1 for select * from book;
    12 fetch c1 into r2_c1;
    13 close c1;
    14 open c1 for select sum(quantity)
    15 from store join sales using (store_key)
    16 group by store_name;
    17 fetch c1 into r3_c1;
    18 close c1;
    19 end;
    20 /

    Although the block does not do anything but open and close the cursor variable, it does demonstrate that weakly typed variables can be defined differently each time the variable is opened. But what happens when a cursor variable is defined with a SQL statement but returns unexpected values? Below is an example of defining a cursor variable of one type and the record as another. The cursor variable is returning all columns in the book table, but the receiving variable is defined as a record of columns from the author table.

    SQL> declare
    2 type auth_cursor is ref cursor;
    3 c1 auth_cursor;
    4 r_c1 author%rowtype;
    5 begin
    6 open c1 for select * from book;
    7 fetch c1 into r_c1;
    8 close c1;
    9 end;
    10 /
    declare
    *
    ERROR at line 1:
    ORA-06504: PL/SQL: Return types of Result Set
    variables or query do not match
    ORA-06512: at line 7

    Notice that the error message is pointing to the DECLARE clause. That is because the block successfully compiled and only threw the error when it was executed. The PL/SQL compiler can not catch the error because the cursor type did not define a return type. By changing the definition of the cursor type to a strongly typed definition, the compiler will catch this error when the code is compiled.

    SQL> declare
    2 type auth_cursor is ref cursor
    3 return book%rowtype;
    4 c1 auth_cursor;
    5 r_c1 author%rowtype;
    6 begin
    7 open c1 for select * from book;
    8 fetch c1 into r_c1;
    9 close c1;
    10 end;
    11 /

    fetch c1 into r_c1;
    *
    ERROR at line 8:
    ORA-06550: line 8, column 5:
    PLS-00394: wrong number of values in the INTO
    list of a FETCH statement
    ORA-06550: line 8, column 5:
    PL/SQL: SQL Statement ignored

    Now the compiler catches the error. So far the examples have been using the cursor variables as regular cursors. The real advantage of using a cursor variable is the ability to pass it as a parameter. In the example below a local function is used to open a cursor called c1 and return it.
    The block body calls the function to assign the cursor to the cursor variable c2. The block body then processes the cursor and closes it.

    SQL> declare
    2 type auth_cursor is ref cursor
    return author%rowtype;
    3 c2 auth_cursor;
    4 r_c2 c2%rowtype;
    5
    6 function get_auth return auth_cursor
    7 is
    8 c1 auth_cursor;
    9 begin
    10 open c1 for select * from author;
    11 return c1;
    12 end;
    13
    14 begin
    15 c2 := get_auth;
    16 loop
    17 fetch c2 into r_c2;
    18 exit when c2%notfound;
    19 dbms_output.put_line(initcap(r_c2.author_last_name));
    20 end loop;
    21 close c2;
    22 end;
    23 /

    Jones
    Hester
    Weaton
    Jackie
    Withers
    Petty
    Clark
    Mee
    Shagger
    Smith

    Line 2 defines the cursor type. Lines 3 and 4 define the cursor and return record used in the body. Line 6 declares a local function called get_auth that returns an auth_cursor type. Inside this local function, cursor c1 is defined as an auth_cursor type, opened and returned to the calling code. The function is actually executed on line 15 when c2 is assigned the return value of the get_auth function. The cursor c2 is processed and finally closed on line 21. Note that c1 opened the cursor and c2 closed it. This is an important point.

    The example contains only ONE cursor. When c2 is assign the value of c1, both variables point to the same cursor. Remember that c1 and c2 are variables that point to or reference the actual cursor.

    The same basic example is shown below except, the output is generated by a local procedure. Note that the procedure print_name gets passed the cursor c2 and then processes it. It then passes the cursor backup to be closed by the body of the PL/SQL block.

    SQL> declare
    2 type auth_cursor is ref cursor
    return author%rowtype;
    3 c2 auth_cursor;
    4 r_c2 c2%rowtype;
    5
    6 function get_auth return auth_cursor
    7 is
    8 c1 auth_cursor;
    9 begin
    10 open c1 for select * from author;
    11 return c1;
    12 end;
    13
    14 procedure print_name (c3 in out auth_cursor)
    15 as
    16 r_c3 author%rowtype;
    17 begin
    18 loop
    19 fetch c3 into r_c3;
    20 exit when c3%notfound;
    21 dbms_output.put_line(initcap(r_c3.author_last_name));
    22 end loop;
    23 end;
    24
    25 begin
    26 c2 := get_auth;
    27 print_name(c2);
    28 close c2;
    29 end;
    30 /

    Jones
    Hester
    Weaton
    Jeckle
    Withers
    Petty
    Clark
    Mee
    Shagger
    Smith

    There are three items you should note about this PL/SQL block. First, the body is pretty simple to understand.

    Get the authors, print the names, and close the cursor. Second, you can pass cursor variables to procedures and functions, and functions can return the variables. Lastly, it can become confusing about when a cursor variable should be closed.

    WHERE CURRENT OF & FOR UPDATE

    The WHERE CURRENT OF clause is used in some UPDATE and DELETE statements.

    The WHERE CURRENT OF clause in an UPDATE or DELETE statement states that the most recent row fetched from the table should be updated or deleted. We must declare the cursor with the FOR UPDATE clause to use this feature.

    Inside a cursor loop, WHERE CURRENT OF allows the current row to be directly updated.

    When the session opens a cursor with the FOR UPDATE clause, all rows in the return set will hold row-level exclusive locks. Other sessions can only query the rows, but they cannot update, delete, or select with FOR UPDATE.

    Oracle provides the FOR UPDATE clause in SQL syntax to allow the developer to lock a set of Oracle rows for the duration of a transaction.

    The syntax of using the WHERE CURRENT OF clause in UPDATE and DELETE statements follows:

    WHERE [CURRENT OF cursor_name | search_condition]

    The following example opens a cursor for employees and updates the commission, if there is no commission assigned based on the salary level.


    The FOR UPDATE clause in the SELECT statement can only be specified in the top level; subqueries cannot have this clause.

    Another Example of WHERE CURRENT OF

    Go through all Maths students and set all GPA’s under 4.0 to 4.0!

    DECLARE
    thisStudent Student%ROWTYPE;

    CURSOR Maths_Student IS
    SELECT * FROM Student WHERE SID IN
    (SELECT SID FROM Take WHERE CID = ’CS145’)
    FOR UPDATE;

    BEGIN
    OPEN Maths_Student;
    LOOP
    FETCH Maths_Student INTO thisStudent;
    EXIT WHEN (Maths_Student%NOTFOUND);
    IF (thisStudent.GPA < 4.0) THEN
    UPDATE Student SET GPA = 4.0
    WHERE CURRENT OF Maths_Student;
    END IF;
    END LOOP;

    CLOSE Maths_Student;
    END;
    .
    RUN;

    PL/SQL Programmer Defined Records

    Programmer Defined Records
    These are records in which you, the programmer, define a record type.

    Example 1 of Programmer Defined Records

    Type my_first_record is record (
     Name Varchar2(20);
     Age Number;
     Salary Number;);
    
    var_of_myfirstrecord my_first_record;
    
    
    DECLARE
     TYPE employee_rectype IS RECORD (
     emp_id  Number(10) NOT NULL
           ,dept_no  dept.dept%TYPE
           ,name  empname_rectype
           ,hire_date DATE:=SYSDATE);
    
    new_emp_rec employee_rectype;
    
    BEGIN
     Do Some Processing...
    END;


    Example 2 of Programmer Defined Records

    Type my_first_record is record (

    Name varchar2(20);
    Age number;
    Salary number;);

    Var_of_myfirstrecord my_first_record;

    Example 3 of Programmer Defined Records
    DECLARE
    
    TYPE employee_rectype IS RECORD (
    emp_id       NUMBER(10) NOT NULL
    ,dept_no     dept.deptno%TYPE
    ,nаme        empnаme_rectype
    ,hire_dаte   DATE := SYSDATE);
    
    new_emp_rec employee_rectype;
    
    BEGIN
    

    Difference between Local & Global Temporary Tables

    Temporary tables are like regular tables, except they are stored in the tempdb and automatically dropped after they have been used.

    Local temporary tableGlobal temporary table
    A Local temporary table is defined by giving it a prefix of # and is scoped to the session in which you created it.Global temporary tables can be seen by all sessions connected to the server and are defined by a prefix of ##.
    An example that creates a local temporary table, populates it with one row, and then selects from it:

    CREATE TABLE #TempTable ( SSN INT, NAME CHAR(3) ) ;

    INSERT INTO #TempTable ( SSN, NAME )
    VALUES ( 1, ‘Sachin’ ) ;
    GO

    SELECT *
    FROM #TempTable ;
    GO

    DROP TABLE #TempTable;
    An example that creates a Global temporary table, populates it with one row, and then selects from it:

    CREATE TABLE ##TempTable ( SSN INT, NAME CHAR(3) ) ;

    INSERT INTO ##TempTable ( SSN, NAME )
    VALUES ( 1, ‘Sachin’ ) ;
    GO

    SELECT *
    FROM ##TempTable ;
    GO

    DROP TABLE ##TempTable;
    Local temporary tables are dropped by using the DROP statement or are automatically removed from memory when the user connection is closed.Global temporary tables are removed from SQL Server if explicitly dropped by DROP TABLE. They are also automatically removed after the connection that created it disconnects and the global temporary table is no longer referenced by other connections.
    It’s easy to be caught out by the scope of a temporary table with SSIS (SQL Server Integration Services). By default, each task in SSIS uses a different connection,which rules out the use of local temporary tables. You can configure SSIS to use a single connection for all tasks, which allows local temporary tables to be used, but be aware that you’ll probably be sacrificing some performance.-

    References:
    1. Difference between temporary variable and temporary table are also explained in depth in "PROFESSIONAL SQL SERVER 2008 INTERNALS AND TROUBLESHOOTING" book.
    2. Book: Pro SQL Server 2008 Administration
    3. Book: SQL Server 2008 Transact-SQL Recipes

    SQL PL/SQL Interview Questions

    What special operators does Oracle provide for dealing with NULLs?

    NVL - Converts a NULL to another specified value, as in:

    my_var := NVL (your_var, 'Hello');

    IS NULL
    and IS NOT NULL

    You can use this syntax to check specificaly to see if a variable's value is NULL or NOT NULL.


    Explain three different rules that apply to NULLs when doing comparisons?

    1. For all operators except for concatenation (||), if a value in an expression is a NULL, that expression evaluates to NULL

    2. NULL is never equal or not equal to another value

    3. NULL is never TRUE or FALSE

    What command would you use to encrypt a PL/SQL application?

    WRAP

    Explain the difference between a FUNCTION, PROCEDURE and PACKAGE.

    A function has a return type in its specification and must return a value specified in that type. A procedure does not have a return type in its specification and should not return any value, but it can have a return statement that simply stops its execution and returns to the caller.

    What steps are included in the compilation process of a PL/SQL block?

    The compilation process includes syntax checking, binding, and p-code generation. Syntax checking involves checking PL/SQL code for compilation errors. After syntax errors have been corrected, a storage address is assigned to the variables that are used to hold data for Oracle. This process is called binding. Next, p-code is generated for the PL/SQL block. P-code is a list of instructions to the PL/SQL engine. For named blocks, p-code is stored in the database, and it is used the next time the program is executed.

    How does a syntax error differ from a runtime error?

    A syntax error can be detected by the PL/SQL compiler. A runtime error occurs while the program is running and cannot be detected by the PL/SQL compiler.

    A misspelled keyword is an example of a syntax error. For example, this script:

    BEIN
    DBMS_OUTPUT.PUT_LINE ('This is a test');
    END;

    contains a syntax error. Try to find it.

    A SELECT INTO statement returning no rows is an example of a runtime error. This error can be handled with the help of the exception-handling section of the PL/SQL block.

    SQL PL/SQL Interview QuestionsDefine Commit, Rollback and Savepoint.

    When a COMMIT statement is issued to the database, the transaction has ended, and the following results are true:

    . All work done by the transaction becomes permanent.

    . Other users can see changes in data made by the transaction.

    . Any locks acquired by the transaction are released.

    When a ROLLBACK statement is issued to the database, the transaction has ended, and the following results are true:

    . All work done by the transaction is undone, as if it hadn’t been issued.

    . Any locks acquired by the transaction are released.

    The ROLLBACK statement undoes all the work done by the user in a specific transaction. With the SAVEPOINT command, however, only part of the transaction can be undone.

    SQL PL/SQL Interview QuestionsExplain Implicit and Explicit cursors

    Oracle automatically declares an implicit cursor every time a SQL statement is executed. The user is unaware of this and cannot control or process the information in an implicit cursor.

    The program defines an explicit cursor for any query that returns more than one row of data. This means that the programmer has declared the cursor within the PL/SQL code block. This declaration allows the application to sequentially process each row of data as the cursor returns it.

    SQL PL/SQL Interview QuestionsHow an Implicit cursor works?

    1. Any given PL/SQL block issues an implicit cursor whenever a SQL statement is executed, as long as an explicit cursor does not exist for that SQL statement.
    2. A cursor is automatically associated with every DML (data manipulation) statement (UPDATE, DELETE, INSERT).
    3. All UPDATE and DELETE statements have cursors that identify the set of rows that will be affected by the operation.
    4. An INSERT statement needs a place to receive the data that is to be inserted into the database; the implicit cursor fulfills this need.
    5. The most recently opened cursor is called the SQL cursor.


    SQL PL/SQL Interview QuestionsHow an Explicit cursor works?

    The process of working with an explicit cursor consists of the following steps:

    1. Declaring the cursor. This initializes the cursor into memory.

    2. Opening the cursor. The declared cursor is opened, and memory is allotted.

    3. Fetching the cursor. The declared and opened cursor can now retrieve data.

    4. Closing the cursor. The declared, opened, and fetched cursor must be closed to release the memory allocation.

    SQL PL/SQL Interview QuestionsWhat are Explicit Cursor attributes


    %NOTFOUNDcursor_name%NOTFOUNDA Boolean attribute that returns TRUE if the previous FETCH did not return a row and FALSE if it did.
    %FOUNDcursor_name%FOUNDA Boolean attribute that returns TRUE if the previous FETCH returned a row and FALSE if it did not.
    %ROWCOUNT cursor_name%ROWCOUNTThe number of records fetched from a cursor at that point in time.
    %ISOPEN cursor_name%ISOPENA Boolean attribute that returns TRUE if the cursor is open and FALSE if it is not.


    SQL PL/SQL Interview QuestionsAnswer any three PL/SQL Exceptions?

    Too_many_rows,
    No_Data_Found,
    Value_Error,
    Zero_Error,
    Others

    SQL PL/SQL Interview QuestionsWhat are PL/SQL Cursor Exceptions?

    Cursor_Already_Open, Invalid_Cursor

    SQL PL/SQL Interview QuestionsWhat is the maximum number of triggers, can apply to a single table?

    12 triggers.

    SQL PL/SQL Interview QuestionsWhat is a mutating table error and how can you get around it?

    This happens with triggers. It occurs because the trigger is trying to update a row it is currently using. The usual fix involves either use of views or temporary tables so the database is selecting from one while updating the other.

    SQL PL/SQL Interview QuestionsWhat packages (if any) has Oracle provided for use by developers?

    Oracle provides the DBMS_ series of packages. There are many which developers should be aware of such as DBMS_SQL, DBMS_PIPE, DBMS_TRANSACTION, DBMS_LOCK, DBMS_ALERT, DBMS_OUTPUT, DBMS_JOB, DBMS_UTILITY, DBMS_DDL, UTL_FILE. If they can mention a few of these and describe how they used them, even better. If they include the SQL routines provided by Oracle, great, but not really what was asked.

    SQL PL/SQL Interview QuestionsDescribe the use of PL/SQL tables

    PL/SQL tables are scalar arrays that can be referenced by a binary integer. They can be used to hold values for use in later queries or calculations. In Oracle 8 they will be able to be of the %ROWTYPE designation, or RECORD.

    SQL PL/SQL Interview QuestionsWhen is a declare statement needed?

    The DECLARE statement is used in PL/SQL anonymous blocks such as with stand alone, non-stored PL/SQL procedures. It must come first in a PL/SQL stand alone file if it is used.

    SQL PL/SQL Interview QuestionsIn what order should a open/fetch/loop set of commands in a PL/SQL block be implemented if you use the %NOTFOUND cursor variable in the exit when statement? Why?

    OPEN then FETCH then LOOP followed by the exit when. If not specified in this order will result in the final return being done twice because of the way the %NOTFOUND is handled by PL/SQL.

    SQL PL/SQL Interview QuestionsWhat are SQLCODE and SQLERRM and why are they important for PL/SQL developers?

    SQLCODE returns the value of the error number for the last error encountered. The SQLERRM returns the actual error message for the last error encountered. They can be used in exception handling to report, or, store in an error log table, the error that occurred in the code. These are especially useful for the WHEN OTHERS exception.

    SQL PL/SQL Interview QuestionsHow can you find within a PL/SQL block, if a cursor is open?

    Use the %ISOPEN cursor status variable.

    SQL PL/SQL Interview QuestionsHow can you generate debugging output from PL/SQL?

    Use the DBMS_OUTPUT package. Another possible method is to just use the SHOW ERROR command, but this only shows errors. The DBMS_OUTPUT package can be used to show intermediate results from loops and the status of variables as the procedure is executed. The new package UTL_FILE can also be used.

    SQL PL/SQL Interview QuestionsWhat are the types of triggers?

    There are 12 types of triggers in PL/SQL that consist of combinations of the BEFORE, AFTER, ROW, TABLE, INSERT, UPDATE, DELETE and ALL key words:
    BEFORE ALL ROW INSERT
    AFTER ALL ROW INSERT
    BEFORE INSERT
    AFTER INSERT etc.

    SQL PL/SQL Interview QuestionsHow can I define a two-dimensional array of numbers in PL/SQL?

    Although PL/SQL does not natively support the declaration and manipulation of multidimensional arrays, you can emulate these structures using nested collection definitions, which were first supported in Oracle9i Database Release 1.

    Here is a brief example to get you started and introduce you to some of the challenges you may encounter as you use collections in this way.

    First, create a collection of associative arrays.

    CREATE OR REPLACE PACKAGE twodim_aa
    IS
    TYPE data_t IS TABLE OF NUMBER
    INDEX BY PLS_INTEGER;

    TYPE array_t IS TABLE OF data_t
    INDEX BY PLS_INTEGER;
    END twodim_aa;
    /

    The first, inner collection—data_t—contains the data for each cell in the two-dimensional array. Each row in the outer collection—array_t—contains a collection of the first type.

    Now declare a variable based on that outer collection type —array_t—, which will serve as a two-dimensional array. In the following script, I declare such a collection—

    DECLARE
    l_2d_grid twodim_aa.array_t;

    —and then assign values to three cells: (1,1), (1,2), and (200,206). Notice that the syntax is different from that used in traditional array cell specification, namely: (1)(1), (1)(2), and (200)(206). Also, since I am using associative arrays to define my two-dimensional array, I do not have to specify a size for this two-dimensional array.


    DECLARE
    l_2d_grid twodim_aa.array_t;
    BEGIN
    l_2d_grid (1) (1) := 100;
    l_2d_grid (1) (2) := 120;
    l_2d_grid (200) (206) := 200;

    IF l_2d_grid (1)(2)