Wednesday, 28 December 2016

Unix (Reading and writing tapes, backups, and archives: The tar command )

The tar command stands for "tape archive". It is the "standard" way to read
and write archives (collections of files and whole directory trees).

Often you will find archives of stuff with names like stuff.tar, or stuff.tar.gz.  This
is stuff in a tar archive, and stuff in a tar archive which has been compressed using the
gzip compression program respectivly.

Chances are that if someone gives you a tape written on a UNIX system, it will be in tar format,
and you will use tar (and your tape drive) to read it.

Likewise, if you want to write a tape to give to someone else, you should probably use
tar as well.

Tar examples:

tar xv      Extracts (x) files from the default tape drive while listing (v = verbose)
            the file names to the screen.
tar tv      Lists the files from the default tape device without extracting them.
tar cv file1 file2     
            Write files 'file1' and 'file2' to the default tape device.
tar cvf archive.tar file1 [file2...]  
            Create a tar archive as a file "archive.tar" containing file1,
            file2...etc.
tar xvf archive.tar  extract from the archive file
tar cvfz archive.tar.gz dname   
            Create a gzip compressed tar archive containing everything in the directory
            'dname'. This does not work with all versions of tar.
tar xvfz archive.tar.gz         
            Extract a gzip compressed tar archive.  Does not work with all versions of tar.
tar cvfI archive.tar.bz2 dname  
            Create a bz2 compressed tar archive. Does not work with all versions of tar

Unix(Files)

ls --- lists your files
ls -l --- lists your files in 'long format', which contains lots of useful information, e.g. the exact size of the file, who owns the file and who has the right to look at it, and when it was last modified.
ls -a --- lists all files, including the ones whose filenames begin in a dot, which you do not always want to see.
There are many more options, for example to list files by size, by date, recursively etc.
  • more filename --- shows the first part of a file, just as much as will fit on one screen. Just hit the space bar to see more or q to quit. You can use /pattern to search for a pattern.
  • emacs filename --- is an editor that lets you create and edit a file. See the emacs page.
  • mv filename1 filename2 --- moves a file (i.e. gives it a different name, or moves it into a different directory (see below)
  • cp filename1 filename2 --- copies a file
  • rm filename --- removes a file. It is wise to use the option rm -i, which will ask you for confirmation before actually deleting anything. You can make this your default by making an alias in your .cshrc file.
  • diff filename1 filename2 --- compares files, and shows where they differ
  • wc filename --- tells you how many lines, words, and characters there are in a file
  • chmod options filename --- lets you change the read, write, and execute permissions on your files. The default is that only you can look at them and change them, but you may sometimes want to change these permissions. For example, chmod o+r filename will make the file readable for everyone, and chmod o-r filename will make it unreadable for others again. Note that for someone to be able to actually look at the file the directories it is in need to be at least executable. See help protection for more details.
  • File Compression
    • gzip filename --- compresses files, so that they take up much less space. Usually text files compress to about half their original size, but it depends very much on the size of the file and the nature of the contents. There are other tools for this purpose, too (e.g. compress), but gzip usually gives the highest compression rate. Gzip produces files with the ending '.gz' appended to the original filename.
    • gunzip filename --- uncompresses files compressed by gzip.
    • gzcat filename --- lets you look at a gzipped file without actually having to gunzip it (same as gunzip -c). You can even print it directly, using gzcat filename | lpr
  • printing
    • lpr filename --- print. Use the -P option to specify the printer name if you want to use a printer other than your default printer. For example, if you want to print double-sided, use 'lpr -Pvalkyr-d', or if you're at CSLI, you may want to use 'lpr -Pcord115-d'. See 'help printers' for more information about printers and their locations.
    • lpq --- check out the printer queue, e.g. to get the number needed for removal, or to see how many other files will be printed before yours will come out
    • lprm jobnumber --- remove something from the printer queue. You can find the job number by using lpq. Theoretically you also have to specify a printer name, but this isn't necessary as long as you use your default printer in the department.
    • genscript --- converts plain text files into postscript for printing, and gives you some options for formatting. Consider making an alias like alias ecop 'genscript -2 -r \!* | lpr -h -Pvalkyr' to print two pages on one piece of paper.
    • dvips filename --- print .dvi files (i.e. files produced by LaTeX). You can use dviselect to print only selected pages. See the LaTeX page for more information about how to save paper when printing drafts.
  • Unix Commands(About other people)

    w --- tells you who's logged in, and what they're doing. Especially useful: the 'idle' part. This allows you to see whether they're actually sitting there typing away at their keyboards right at the moment.

  • who --- tells you who's logged on, and where they're coming from. Useful if you're looking for someone who's actually physically in the same building as you, or in some other particular location.

  • finger username --- gives you lots of information about that user, e.g. when they last read their mail and whether they're logged in. Often people put other practical information, such as phone numbers and addresses, in a file called .plan. This information is also displayed by 'finger'.

  • last -1 username --- tells you when the user last logged on and off and from where. Without any options, last will give you a list of everyone's logins.

  • talk username --- lets you have a (typed) conversation with another user .

  • write username --- lets you exchange one-line messages with another user.

  • elm --- lets you send e-mail messages to people around the world (and, of course, read them). It's not the only mailer you can use, but the one we recommend. See the elm page, and find out about the departmental mailing lists (which you can also find in /user/linguistics/helpfile).
  • Unix Commands(Basics of the vi editor)

    vi filename

                    Creating text
    Edit modes: These keys enter editing modes and type in the text
    of your document.

    i     Insert before current cursor position
    I     Insert at beginning of current line
    a     Insert (append) after current cursor position
    A     Append to end of line
    r     Replace 1 character
    R     Replace mode
    <ESC> Terminate insertion or overwrite mode

                     Deletion of text

    x     Delete single character
    dd    Delete current line and put in buffer
    ndd   Delete n lines (n is a number) and put them in buffer
    J     Attaches the next line to the end of the current line (deletes carriage return).

                     Oops

    u     Undo last command

                     cut and paste
    yy    Yank current line into buffer
    nyy   Yank n lines into buffer
    p     Put the contents of the buffer after the current line
    P     Put the contents of the buffer before the current line

                    cursor positioning
    ^d    Page down
    ^u    Page up
    :n    Position cursor at line n
    :$    Position cursor at end of file
    ^g    Display current line number
    h,j,k,l Left,Down,Up, and Right respectivly. Your arrow keys should also work if
          if your keyboard mappings are anywhere near sane.

                   string substitution

    :n1,n2:s/string1/string2/[g]       Substitute string2 for string1 on lines
                                       n1 to n2. If g is included (meaning global), 
                                       all instances of string1 on each line
                                       are substituted. If g is not included,
                                       only the first instance per matching line is
                                       substituted.

        ^ matches start of line
        . matches any single character
        $ matches end of line

    These and other "special characters" (like the forward slash) can be "escaped" with \
    i.e to match the string "/usr/STRIM100/SOFT" say "\/usr\/STRIM100\/SOFT"

    Examples:

    :1,$:s/dog/cat/g                   Substitute 'cat' for 'dog', every instance
                                       for the entire file - lines 1 to $ (end of file)

    :23,25:/frog/bird/                 Substitute 'bird' for 'frog' on lines
                                       23 through 25. Only the first instance
                                       on each line is substituted.


                  Saving and quitting and other "ex" commands

    These commands are all prefixed by pressing colon (:) and then entered in the lower
    left corner of the window. They are called "ex" commands because they are commands
    of the ex text editor - the precursor line editor to the screen editor
    vi.   You cannot enter an "ex" command when you are in an edit mode (typing text onto the screen)
    Press <ESC> to exit from an editing mode.

    :w                Write the current file.
    :w new.file       Write the file to the name 'new.file'.
    :w! existing.file Overwrite an existing file with the file currently being edited.
    :wq               Write the file and quit.
    :q                Quit.
    :q!               Quit with no changes.

    :e filename       Open the file 'filename' for editing.

    :set number       Turns on line numbering
    :set nonumber     Turns off line numbering

    Sunday, 25 December 2016

    Dynamic SQL

    Dynamic SQL
    Dynamic SQL describes any SQL DML statement assembled dynamically at runtime as a string and then submitted.

    Dynamic SQL is very useful for several tasks:
    # Multiple possible query criteria can be dynamically assembled into custom FROM, WHERE and ORDERS BY clauses for flexible queries.
    # Code can respond to the schema of the database and generate appropriate triggers, CRUD stored procedures and views.
    # Dynamic code can auto-generate very consistent stored procedures.

    Drawbacks of Dynamic SQL
    # Dynamic SQL that includes user entries in WHERE clauses can be open to SQL injection atacks.
    # Poorly written dynamic SQL queries often include extra table references and perform poorly.
    # T-SQL code that generates T-SQL code can be tricky to debug.

    [Via Microsoft SQL Server 2008 Bible By Paul Nielsen, Uttam Parui]

    Below are few awesome resources on Dynamic SQL:

    1. Below Dynamic SQL link includes: What is Dynamic SQL, Steps used in processing Dynamic SQL etc.
    MSDN

    2. Below Dynamic SQL link includes: What is Dynamic SQL?, Dynamic SQL vs. Stored Procedures, When to Use Dynamic SQL?, How we can use Dynamic SQL etc.
    Benkotips

    3. The Curse and Blessings of Dynamic SQL include: Introducing Dynamic SQL, Dynamic SQL and Stored Procedures, Good Coding Practices and Tips for Dynamic SQL, Common Cases when to (Not) Use Dynamic SQL etc.
    Sommarskog

    4. Building Dynamic SQL In a Stored Procedure includes: sp_executesql Vs EXECUTE Command, Using Like Operator, IN Operator and Order By In Dynamic SQL etc.
    Code Project

    5. Introduction to Dynamic SQL - Part-1 and Part-2

    6. Using Dynamic SQL Statements in Stored Procedures

    7. Dynamic SQL & SQL injection

    Although static SQL works well in many situations, there is a class of applications in which the data access cannot be determined in advance. For example, suppose a spreadsheet allows a user to enter a query, which the spreadsheet then sends to the DBMS to retrieve data. The contents of this query obviously cannot be known to the programmer when the spreadsheet program is written.
    To solve this problem, the spreadsheet uses a form of embedded SQL called dynamic SQL. Unlike static SQL statements, which are hard-coded in the program, dynamic SQL statements can be built at run time and placed in a string host variable. They are then sent to the DBMS for processing. Because the DBMS must generate an access plan at run time for dynamic SQL statements, dynamic SQL is generally slower than static SQL. When a program containing dynamic SQL statements is compiled, the dynamic SQL statements are not stripped from the program, as in static SQL. Instead, they are replaced by a function call that passes the statement to the DBMS; static SQL statements in the same program are treated normally.
    The simplest way to execute a dynamic SQL statement is with an EXECUTE IMMEDIATE statement. This statement passes the SQL statement to the DBMS for compilation and execution.
    One disadvantage of the EXECUTE IMMEDIATE statement is that the DBMS must go through each of the five steps of processing an SQL statement each time the statement is executed. The overhead involved in this process can be significant if many statements are executed dynamically, and it is wasteful if those statements are similar. To address this situation, dynamic SQL offers an optimized form of execution called prepared execution, which uses the following steps:
    1. The program constructs an SQL statement in a buffer, just as it does for the EXECUTE IMMEDIATE statement. Instead of host variables, a question mark (?) can be substituted for a constant anywhere in the statement text to indicate that a value for the constant will be supplied later. The question mark is called as a parameter marker.
    2. The program passes the SQL statement to the DBMS with a PREPARE statement, which requests that the DBMS parse, validate, and optimize the statement and generate an execution plan for it. The program then uses an EXECUTE statement (not an EXECUTE IMMEDIATE statement) to execute the PREPARE statement at a later time. It passes parameter values for the statement through a special data structure called the SQL Data Area or SQLDA.
    3. The program can use the EXECUTE statement repeatedly, supplying different parameter values each time the dynamic statement is executed.
    Prepared execution is still not the same as static SQL. In static SQL, the first four steps of processing an SQL statement take place at compile time. In prepared execution, these steps still take place at run time, but they are performed only once; execution of the plan takes place only when EXECUTE is called. This helps eliminate some of the performance disadvantages inherent in the architecture of dynamic SQL. The next illustration shows the differences between static SQL, dynamic SQL with immediate execution, and dynamic SQL with prepared execution.
    Show:
       

    Difference Between Rank, Dense_Rank & Row_Number

    Difference Between Rank, Dense_Rank & Row_Number


    Rank, Dense_Rank and Row_Number are ranking functions in SQL Server.

    1. The difference between rank/dense_rank and row_number is that, row_number is not deterministic when the order-by list is not unique. Rank and dense_rank are always deterministic, that is, the same ranking values are assigned to rows with same sort values.

    As per SQL Server 2016 and later all three i.e. Rank, Dense_Rank and Row_Number are Nondeterministic functions.

    2. The difference between rank and dense_rank is that rank might have gaps in the ranking values, but allows you to know how many rows have lower sort values. Dense_rank values have no gaps.

    Look at the results below - rank values are 1, 1, 1, 4, 5 (have a gap) and results of dense_rank 1, 1, 1, 2, 3 (have no gap). [Source: Inside Microsoft SQL Server 2008 T-SQL Querying: T-SQL Querying, Microsoft SQL Server 2012 Unleashed]

    3. The difference between rank and dense_rank is that rank indicates how many rows have a lower ordering value, whereas dense_rank indicates how many distinct ordering values are lower. For example, a rank of 9 indicates eight rows with lower values. A dense_rank of 9 indicates eight distinct lower values. [Source: Microsoft SQL Server Interview Questions By Chandan Sinha]

    4. Rank counts each tie as a ranked row. Dense_rank handles ties differently. Tied rows only consume a single value in the ranking, so the next rank is the next place in the ranking order. No ranks are skipped. [Source: Microsoft SQL Server 2008 Bible By Paul Nielsen, Uttam Parui]

    Very simple example depicting the difference in results of rank, dense_rank and row_number
    CREATE TABLE Z2
    (
    Name varchar(255)
    );
    
    insert into Z2 values ('a');
    insert into Z2 values ('a');
    insert into Z2 values ('a');
    insert into Z2 values ('b');
    insert into Z2 values ('c');
    
    Select * from Z2
    
           
    Name
    a
    a
    a
    b
    c


    SELECT *, Rank() over (ORDER BY Name ASC) AS rank_example FROM Z2;

    SELECT *, Dense_rank() over (ORDER BY Name ASC) AS dense_rank_example FROM Z2;

    SELECT *, Row_number() over (ORDER BY Name ASC) AS row_number_example FROM Z2;

               
    Namerank_example
    a1
    a1
    a1
    b4
    c5

               
    Namedense_rank_example
    a1
    a1
    a1
    b2
    c3

               
    Namerow_number_example
    a1
    a2
    a3
    b4
    c5

    Examples of Merge Statement’s Output Clause

    Examples of Merge Statement’s Output Clause

    We are using the same tables and merge statement as used in an example previously. Below are just four simple ways you can use output clause with the merge statement.

    Example 1 of Output clause:

    In this first example, @MergeOutput1 is declared as a table variable. It has columns for old mobile names and new mobile names. Similarly columns for old company names and new company names are there. ActionType column shows the type of modification that is performed on the table when rows are merged. Lastly it also has a MobileID column which is common to both the tables Mobiles and Mobiles_New.

    Output clause of the merge statement is inserting the values in the @MergeOutput1 variable. At last we are using select statement to view the rows of the @MergeOutput1 table variable.
    CREATE TABLE [Mobiles]
        (
          [MobileID] [int] PRIMARY KEY,
          [MobileName] [nvarchar](64),
          [Company] [nvarchar](50)
        );
       
    CREATE TABLE [Mobiles_New]
        (
          [MobileID] [int] PRIMARY KEY,
          [MobileName] [nvarchar](64),
          [Company] [nvarchar](50)
        );
       
          INSERT  INTO [Mobiles]
    VALUES  ( 1, 'Nokia 100', 'MS' )
    ,       ( 2, 'Nokia 120', 'MS' )
    ,       ( 3, 'Nokia 130', 'MS' )
    ,       ( 4, 'N72', 'Nokia' )
    ,       ( 5, 'P21', 'Panaonic' )
    ,       ( 6, 'M69', 'Micromax' );
    
    
    INSERT  INTO [Mobiles_New]
    VALUES  ( 1, 'Microsoft 100', 'Microsoft' )
    ,       ( 2, 'Microsoft 120', 'Microsoft' )
    ,       ( 3, 'Microsoft 130', 'Microsoft' )
    ,       ( 4, 'Nokia 72', 'Microsoft' )
    ,       ( 7, 'iPhone', 'Apple' );
    
    Select * from Mobiles
    Select * from Mobiles_New
    
    
    DECLARE @MergeOutput1 table
    
    (
    
      ActionType nvarchar(10),
      MobileID int,
      OldMobileName nvarchar(65),
      NewMobileName nvarchar(65),
      OldCompany nvarchar(55),
      NewCompany nvarchar(55)
    
    );
    MERGE [dbo].[Mobiles] AS [OLD_Tbl]
    USING [dbo].[Mobiles_New] AS [New_Tbl]
    ON ( OLD_Tbl.[MobileID] = New_Tbl.[MobileID] )
    WHEN MATCHED AND OLD_Tbl.[MobileName] <>
    New_Tbl.[MobileName]
        OR OLD_Tbl.[Company] <> New_Tbl.[Company] THEN
        UPDATE SET OLD_Tbl.[MobileName] = New_Tbl.[MobileName]
    ,
                   OLD_Tbl.[Company] = New_Tbl.[Company]
    WHEN NOT MATCHED THEN
        INSERT ( [MobileID] ,
                 [MobileName] ,
                 [Company]
               )
        VALUES ( New_Tbl.[MobileID] ,
                 New_Tbl.[MobileName] ,
                 New_Tbl.[Company]
               )
    WHEN NOT MATCHED BY SOURCE THEN
        DELETE
    OUTPUT
        $Action ,
        INSERTED.MobileID,
        DELETED.MobileName,
        Inserted.MobileName,
        DELETED.Company,
        Inserted.Company
          INTO @MergeOutput1;
    
    Select * from @MergeOutput1;
    

    Result:


    Example 2 of Output clause:

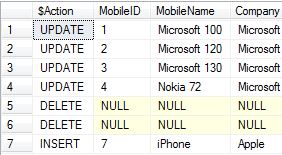
    INSERTED is a column prefix that specifies the value added by the insert or update operation. In simple words when using output clause, a table called the inserted table is created for all the insert operations. A table called the deleted table is created for delete operations.

    Here we are showing all three columns i.e. MobileID, MobileName and Company using "INSERTED" column prefix with "*".

    Drop table Mobiles
    Drop table Mobiles_New
    
    CREATE TABLE [Mobiles]
        (
          [MobileID] [int] PRIMARY KEY,
          [MobileName] [nvarchar](64),
          [Company] [nvarchar](50)
        );
       
    CREATE TABLE [Mobiles_New]
        (
          [MobileID] [int] PRIMARY KEY,
          [MobileName] [nvarchar](64),
          [Company] [nvarchar](50)
        );
       
          INSERT  INTO [Mobiles]
    VALUES  ( 1, 'Nokia 100', 'MS' )
    ,       ( 2, 'Nokia 120', 'MS' )
    ,       ( 3, 'Nokia 130', 'MS' )
    ,       ( 4, 'N72', 'Nokia' )
    ,       ( 5, 'P21', 'Panaonic' )
    ,       ( 6, 'M69', 'Micromax' );
    
    
    INSERT  INTO [Mobiles_New]
    VALUES  ( 1, 'Microsoft 100', 'Microsoft' )
    ,       ( 2, 'Microsoft 120', 'Microsoft' )
    ,       ( 3, 'Microsoft 130', 'Microsoft' )
    ,       ( 4, 'Nokia 72', 'Microsoft' )
    ,       ( 7, 'iPhone', 'Apple' );
    
    Select * from Mobiles
    Select * from Mobiles_New
    
    MERGE [dbo].[Mobiles] AS [OLD_Tbl]
    USING [dbo].[Mobiles_New] AS [New_Tbl]
    ON ( OLD_Tbl.[MobileID] = New_Tbl.[MobileID] )
    WHEN MATCHED AND OLD_Tbl.[MobileName] <>
    New_Tbl.[MobileName]
        OR OLD_Tbl.[Company] <> New_Tbl.[Company] THEN
        UPDATE SET OLD_Tbl.[MobileName] = New_Tbl.[MobileName]
    ,
                   OLD_Tbl.[Company] = New_Tbl.[Company]
    WHEN NOT MATCHED THEN
        INSERT ( [MobileID] ,
                 [MobileName] ,
                 [Company]
               )
        VALUES ( New_Tbl.[MobileID] ,
                 New_Tbl.[MobileName] ,
                 New_Tbl.[Company]
               )
    WHEN NOT MATCHED BY SOURCE THEN
        DELETE
    OUTPUT
        $Action,
        INSERTED.*;
    

    Result:

    Example 3 of Output clause:

    Here, in this example, instead of using "*" to show all the columns we have used "." to show individual columns which we want to see in the result.

    Drop table Mobiles
    Drop table Mobiles_New
    
    CREATE TABLE [Mobiles]
        (
          [MobileID] [int] PRIMARY KEY,
          [MobileName] [nvarchar](64),
          [Company] [nvarchar](50)
        );
       
    CREATE TABLE [Mobiles_New]
        (
          [MobileID] [int] PRIMARY KEY,
          [MobileName] [nvarchar](64),
          [Company] [nvarchar](50)
        );
       
          INSERT  INTO [Mobiles]
    VALUES  ( 1, 'Nokia 100', 'MS' )
    ,       ( 2, 'Nokia 120', 'MS' )
    ,       ( 3, 'Nokia 130', 'MS' )
    ,       ( 4, 'N72', 'Nokia' )
    ,       ( 5, 'P21', 'Panaonic' )
    ,       ( 6, 'M69', 'Micromax' );
    
    
    INSERT  INTO [Mobiles_New]
    VALUES  ( 1, 'Microsoft 100', 'Microsoft' )
    ,       ( 2, 'Microsoft 120', 'Microsoft' )
    ,       ( 3, 'Microsoft 130', 'Microsoft' )
    ,       ( 4, 'Nokia 72', 'Microsoft' )
    ,       ( 7, 'iPhone', 'Apple' );
    
    Select * from Mobiles
    Select * from Mobiles_New
    
    MERGE [dbo].[Mobiles] AS [OLD_Tbl]
    USING [dbo].[Mobiles_New] AS [New_Tbl]
    ON ( OLD_Tbl.[MobileID] = New_Tbl.[MobileID] )
    WHEN MATCHED AND OLD_Tbl.[MobileName] <>
    New_Tbl.[MobileName]
        OR OLD_Tbl.[Company] <> New_Tbl.[Company] THEN
        UPDATE SET OLD_Tbl.[MobileName] = New_Tbl.[MobileName]
    ,
                   OLD_Tbl.[Company] = New_Tbl.[Company]
    WHEN NOT MATCHED THEN
        INSERT ( [MobileID] ,
                 [MobileName] ,
                 [Company]
               )
        VALUES ( New_Tbl.[MobileID] ,
                 New_Tbl.[MobileName] ,
                 New_Tbl.[Company]
               )
    WHEN NOT MATCHED BY SOURCE THEN
        DELETE
    OUTPUT
        $Action,
        INSERTED.MobileID,
        INSERTED.MobileName,
        INSERTED.Company;
    

    Result:


    Example 4 of Output clause:

    You can refer any column of the source table (Mobiles_New in our case) in the merge statement's output clause.
    Drop table Mobiles
    Drop table Mobiles_New
    
    CREATE TABLE [Mobiles]
        (
          [MobileID] [int] PRIMARY KEY,
          [MobileName] [nvarchar](64),
          [Company] [nvarchar](50)
        );
       
    CREATE TABLE [Mobiles_New]
        (
          [MobileID] [int] PRIMARY KEY,
          [MobileName] [nvarchar](64),
          [Company] [nvarchar](50)
        );
       
          INSERT  INTO [Mobiles]
    VALUES  ( 1, 'Nokia 100', 'MS' )
    ,       ( 2, 'Nokia 120', 'MS' )
    ,       ( 3, 'Nokia 130', 'MS' )
    ,       ( 4, 'N72', 'Nokia' )
    ,       ( 5, 'P21', 'Panaonic' )
    ,       ( 6, 'M69', 'Micromax' );
    
    
    INSERT  INTO [Mobiles_New]
    VALUES  ( 1, 'Microsoft 100', 'Microsoft' )
    ,       ( 2, 'Microsoft 120', 'Microsoft' )
    ,       ( 3, 'Microsoft 130', 'Microsoft' )
    ,       ( 4, 'Nokia 72', 'Microsoft' )
    ,       ( 7, 'iPhone', 'Apple' );
    
    Select * from Mobiles
    Select * from Mobiles_New
    
    MERGE [dbo].[Mobiles] AS [OLD_Tbl]
    USING [dbo].[Mobiles_New] AS [New_Tbl]
    ON ( OLD_Tbl.[MobileID] = New_Tbl.[MobileID] )
    WHEN MATCHED AND OLD_Tbl.[MobileName] <>
    New_Tbl.[MobileName]
        OR OLD_Tbl.[Company] <> New_Tbl.[Company] THEN
        UPDATE SET OLD_Tbl.[MobileName] = New_Tbl.[MobileName]
    ,
                   OLD_Tbl.[Company] = New_Tbl.[Company]
    WHEN NOT MATCHED THEN
        INSERT ( [MobileID] ,
                 [MobileName] ,
                 [Company]
               )
        VALUES ( New_Tbl.[MobileID] ,
                 New_Tbl.[MobileName] ,
                 New_Tbl.[Company]
               )
    WHEN NOT MATCHED BY SOURCE THEN
        DELETE
    OUTPUT
        $Action,
        INSERTED.MobileID,
        INSERTED.MobileName,
        INSERTED.Company,
        New_Tbl.MobileID;   
    

    Result: